Pivot Hinge Documentation
Pivot or Knife Hinge?
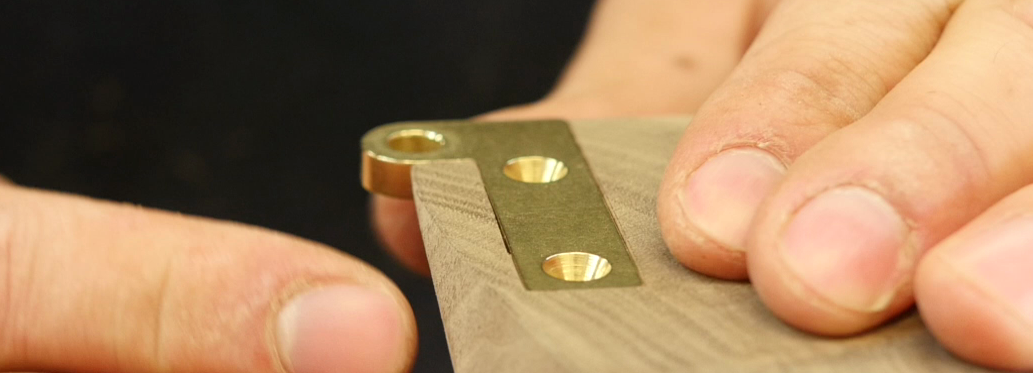
We at Brusso use those terms interchangeably and you will find both terms used on our website. According to Google, the term "Pivot Hinge" is more popular than the term "Knife Hinge". For the rest of this article we will refer to the hinge pictured as pivot hinges.
Install Videos
To make life easier for our customers Brusso has produced a few install videos of the pivot hinges that can be seen on our YouTube channel. Click below to take a look.
Also, take a look at these videos from other woodworkers.
What size Pivot Hinge should I use?
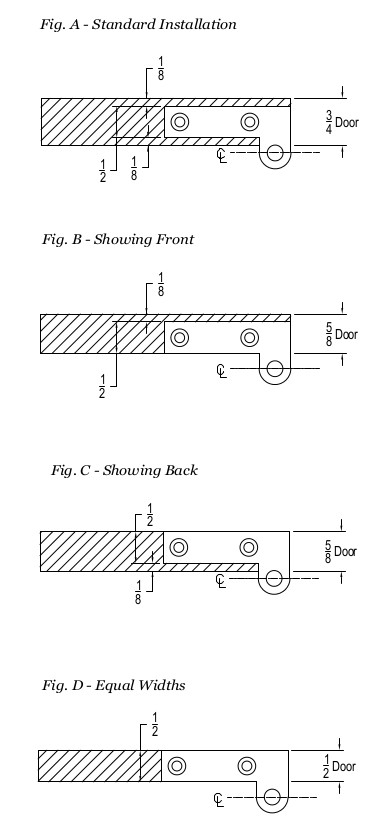
We advise that you leave 1/8" of material on either side of your pivot hinge after it is installed and mortised. This means you should choose a pivot hinge that is 1/4" smaller in width than the thickness of your mortising surface (door, frame, box, etc). Using this rule, a woodworker with 3/4" thick door stock should use an L-87 offset pivot hinge or an ST-80 center pivot hinge. Both of these hinges have a 1/2" wide leaf.
The reason for this rule is that mortising while leaving anything less than 1/8" of extra stock can lead to blowout. For an example of an installation following this rule, see Figure A.
Click below to view our full line of Pivot Hinges:
Center Pivot Hinges
Offset Pivot Hinges
How should I layout my mortise?
Pictured you can see a few of the different possibilities for placing a mortise. In this article we are going to layout a few important guidelines that should set you on the right direction. The first guideline to keep in mind is that at least 50% of the pivot pin must be showing after the hinge is installed. Typically, mortising the hinge any deeper will cause the door not to operate. Having said this, it is technically possible to mortise the door deeper than 50% of the pivot pin but it will require a more advanced installation. This installation would require the woodworker to relieve material around the door and/or jam to prevent the two members from creating a stop.
The second guideline has to do with cosmetics. Often times woodworkers use pivot hinges to reduce the amount of hardware showing on a project and give a more "low profile" look. If this "low profile" look is your goal, you should follow our guideline above. Which will result in the installation pictured in Figure A. If you want to use a smaller door with a larger hinge than recommended in our guideline above - you can. Take a look at Figure's B, C, and D. In Figure D, the hinge and the door are the same thickness which means that the most amount of hinge hardware is showing. To view a larger version of this diagram click here.
Find the hinge that's right for you - see our full line of Pivot Hinges
How do I install an offset pivot hinge?
Take a look at our written installation instructions. Note, even if you're not using the TJ-L37 installation template, the instruction PDF and video linked below should still be useful:
- Offest Pivot Hinge Installation Instructions [PDF]
- Center Pivot Hinge Installation Instructions [PDF]
- TJ-L37 Install Instructions [PDF]
- TJ-L37 Install Video [YouTube]
Click here to learn more about the TJ-L37 installation template.
What is the weight rating for your pivot hinges?
We have conducted BHMA/ANSI testing on many of our pivot hinge sizes and would be glad to help you pick the best hinge for your application. For information on weight rating please email us. Please be prepared to provide detailed information about your application including the door thickness, quantities, materials, and application information. If your application requires additional testing, let us know, and we can arrange to have the appropriate testing done for a fee.
To get the best performance out of your pivot hinges we recommend always applying lubricant to the pivot pin of any hinge in a high traffic application. Also, selecting a stainless steel hinge over a brass hinge will inherietly provide more strength and wear resistance over time.
Ready to buy? Click here to view our full line of Pivot Hinges
I have a protruding trim that is x". What size pivot hinge will offset for this feature?
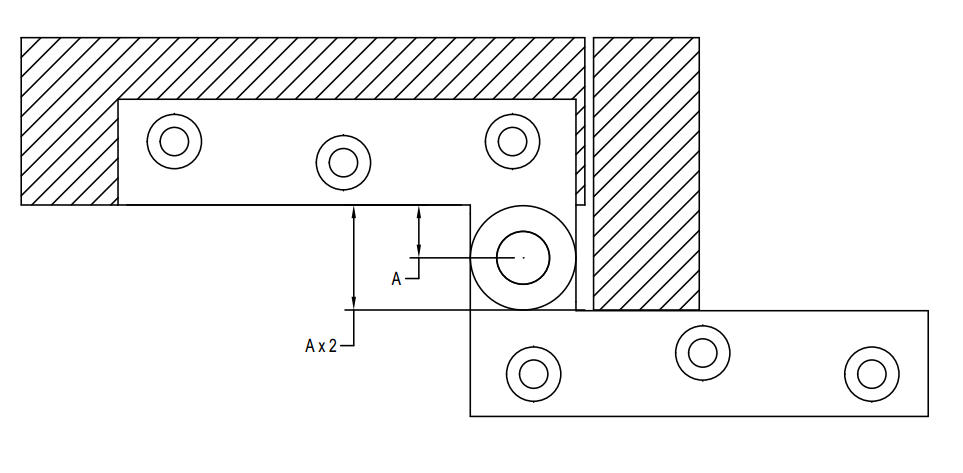
Using a typical butt hinge a door with an offset trim, beaded edge, or other protrusion from the frame will have a limited range of motion. Using Brusso's offset pivot hinges, the pivot point of the hinge extends beyond the surface of the door providing a larger allowance. See the drawing below for an example of a door that can still open to 180 degrees despite the fact that there is a protruding trim.
The maximum allowable trim for each pivot hinge is controlled Dimension A shown below. Dimension A is the distance from the installed surface of the hinge and the centerline of the pivot pin. To maintain a 180 degree range of motion, the maximum allowable offset is represented by the formula:
Max offset = A x 2
Be advised, this calculation is from the edge of the installed surface, not necessarily the edge of the hinge. If there is a 1/8" gap between the hinge and the door edge that must be accounted for in your calculation. Click here to see a full sized version of this diagram.
An example of this is our L-19 Pivot Hinges. Shown below you can see that the distance from the edge of the leaf to the centerline of the pivot pin is 3/4". Assuming you are using the Equal Widths installation method (Fig. D above) this hinge can be installed in doors that have a protruding trim up to 1-1/2". If the hinge is installed 1/8" into the frame and 1/8" into the door (Fig. A) the maximum allowable offset is reduced to 1-1/4".
Online Videos
Here are some videos from other makers that display our pivot hinges in use.


